Using SCons with GNU toolchain for ARM on Windows – part 3 : the SCons script

[part 1 part 2 part 3]

So we have prepared the code that we want to compile using SCons.

1. Command prompt

Since SCons will be invoked from the command line, it’s nice to have a batch file that will open the prompt with the necessary settings; so let’s create the following file in the project folder and call it shell.bat:

REM Add Python and tool-chain locations to system path
set PYTHON_PATH=C:\Python27
set GNUARM_PATH=D:\APPLICATIONS\_DEVELOPMENT\_LANG\GNUARM\GNU Tools ARM Embedded\4.9 2014q4\bin
set OPENOCD_PATH=D:\APPLICATIONS\_DEVELOPMENT\_LANG\GNUARM\OpenOCD\openocd-0.8.0\bin-x64

set PATH=%PYTHON_PATH%;%GNUARM_PATH%;%OPENOCD_PATH%;%PATH%

start cmd.exe

Of course the specified paths must be substituted with correct ones. Now, if we double-click on the shell.bat file, a new command prompt will be opened.

2. The SCons script

Let’s then create a file in the project folder and call it SConstruct with the following contents:

# gnu arm toolchain must be already in system path

import os
env = Environment(ENV = os.environ)

env['AR'] = 'arm-none-eabi-ar'
env['AS'] = 'arm-none-eabi-as'
env['CC'] = 'arm-none-eabi-gcc'
env['CXX'] = 'arm-none-eabi-g++'
env['LINK'] = 'arm-none-eabi-g++'                # predefined is 'arm-none-eabi-gcc'
env['RANLIB'] = 'arm-none-eabi-ranlib'
env['OBJCOPY'] = 'arm-none-eabi-objcopy'
env['PROGSUFFIX'] = '.elf'

# include locations
env['CPPPATH'] = [
    '#Inc',
    '#Drivers/CMSIS/Include',
    '#Drivers/CMSIS/Device/ST/STM32F4xx/Include',
    '#Drivers/STM32F4xx_HAL_Driver/Inc',
    '#Drivers/STM32F4xx_HAL_Driver/Inc/Legacy',
    ]

# compiler flags
env.Append(CCFLAGS = [
    '-mcpu=cortex-m4',
    '-mthumb',
    '-O2',
    '-fsigned-char',
    '-ffunction-sections',
    '-fdata-sections',
    '-std=gnu11',
    '-fmessage-length=0',
    '-mthumb-interwork',
    ])

# linker flags
env.Append(LINKFLAGS = [
    '-ffunction-sections',
    '-fdata-sections',
    '-TTrueSTUDIO/Discovery001 Configuration/STM32F407VG_FLASH.ld',
    '-Xlinker',
    '--gc-sections',
    '--specs=nano.specs',
    ]) 

# defines
env.Append(CPPDEFINES = [
    'STM32F407xx',
])

# build everything
prg = env.Program(
    target = 'main',
    source = [
        'Src/main.c',
        'Src/stm32f4xx_hal_msp.c',
        'Src/stm32f4xx_it.c',
        'Src/sys/startup_stm32f4xx_fromCoocox.c',
        'Drivers/CMSIS/Device/ST/STM32F4xx/Source/Templates/system_stm32f4xx.c',
        'Drivers/STM32F4xx_HAL_Driver/Src/stm32f4xx_hal.c',
        'Drivers/STM32F4xx_HAL_Driver/Src/stm32f4xx_hal_cortex.c',
        'Drivers/STM32F4xx_HAL_Driver/Src/stm32f4xx_hal_dma.c',
        'Drivers/STM32F4xx_HAL_Driver/Src/stm32f4xx_hal_dma_ex.c',
        'Drivers/STM32F4xx_HAL_Driver/Src/stm32f4xx_hal_flash.c',
        'Drivers/STM32F4xx_HAL_Driver/Src/stm32f4xx_hal_flash_ex.c',
        'Drivers/STM32F4xx_HAL_Driver/Src/stm32f4xx_hal_flash_ramfunc.c',
        'Drivers/STM32F4xx_HAL_Driver/Src/stm32f4xx_hal_gpio.c',
        'Drivers/STM32F4xx_HAL_Driver/Src/stm32f4xx_hal_pwr.c',
        'Drivers/STM32F4xx_HAL_Driver/Src/stm32f4xx_hal_pwr_ex.c',
        'Drivers/STM32F4xx_HAL_Driver/Src/stm32f4xx_hal_rcc.c',
        'Drivers/STM32F4xx_HAL_Driver/Src/stm32f4xx_hal_rcc_ex.c',
        'Drivers/STM32F4xx_HAL_Driver/Src/stm32f4xx_hal_uart.c',
    ]
)

# binary file builder
def arm_generator(source, target, env, for_signature):
    return '$OBJCOPY -O binary %s %s'%(source[0], target[0])
env.Append(BUILDERS = {
    'Objcopy': Builder(
        generator=arm_generator,
        suffix='.bin',
        src_suffix='.elf'
    )
})

env.Objcopy(prg)

This is our SCons configuration file. SCons experts will deservedly turn their nose up, because it’s super-simplified. SCons can do a lot more and better, but this script works and proves how it can be used to cross-compile for our target.

What the script does is very simple:

  • In the first section it set the parameters that inform SCons about the toolchain we are using.
  • Then the include libraries are added, together with compiler and linker flags.
  • Finally all the sources are compiled and the final program is built. Afterwards the produced .elf file is converted in the binary form suitable for uploading to flash.

3. Building and uploading the project

In order to build the project, open a new command prompt by double cliccking on the previously created shell.bat file and type scons.

If everything works, at the end you should read something like “scons: done building targets.” and a couple of files should now be present in the project folder: main.elf and main.bin.

The second one can be uploaded to the MCU flash using the command:

openocd -f board/stm32f4discovery.cfg -c "init; reset halt; flash write_image erase main.bin 0x08000000; reset run; shutdown"

After some seconds, the board should start blinking, and if you connect to the USART2 port some chars are received.

Happy coding!
Using SCons with GNU toolchain for ARM on Windows – part 2 : the code

[part 1 part 2 part 3]

After downloading and installing all the necessary tools (see my previous post), I will create a project for the discovery board using STM32CubeMX tool.
The application will just send some bytes through the serial port USART2 and light the LEDs on the discovery board.

 1. The STM32CubeMX project

So, let’s start creating the STM32CubeMX project. The STM32F4Discovery board I’m using is equipped with a STM32F407VGT6 MCU; so that’s the platform I’m going to choose in the new project wizard.

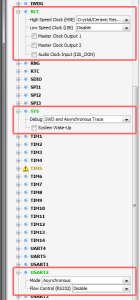
The various configuration steps are described in the attached figures, and I’m not going to detail every step since they are relatively straightforward.

a) Peripheral selection

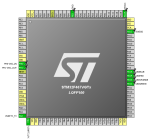
Peripheral Configuration

b) GPIO configuration

Pin Configuration

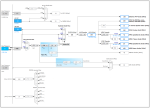
c) clock configuration

Clock Configuration

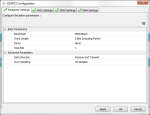
d) Peripheral configuration: USART2
USART Configuration
e) Peripheral configuration: GPIOs
GPIO Configuration
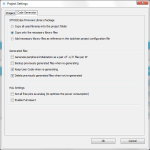
f) Project settings: project
Project Settings - code generation
g) Project settings: code generator

Project Settings2. Code generation

Now the code can be generated by clicking on the Project > Generate Code menu. If requested, allow STM32CubeMX to download the necessary device libraries.

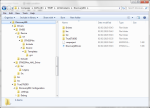
The generated project looks like this:

stm32cubemx_generatedcode

3. Code editing

The generated code (see Src/main.c) does nothing but configuring the MCU hardware, so we need to edit the code to send data through serial port and light up the leds.

Let’s modify the main.c file between the /* USER CODE BEGIN 3 */ and /* USER CODE END 3 */ as follows:

/* USER CODE BEGIN 3 */
  /* Infinite loop */
  uint8_t c = 'A';
  uint16_t cnt = 0;
  while (1)
  {
	  HAL_UART_Transmit(&huart2, &c, 1, 10);
	  c++;
	  if(c == ('Z'+1)) c = 'A';
	  switch(cnt) {
	  case 0:
		  // green led on
		  HAL_GPIO_WritePin(GPIOD, GPIO_PIN_12, GPIO_PIN_SET);
		  break;
	  case 100:
		  // green led off
		  HAL_GPIO_WritePin(GPIOD, GPIO_PIN_12, GPIO_PIN_RESET);
		  break;
	  case 200:
		  // orange led on
		  HAL_GPIO_WritePin(GPIOD, GPIO_PIN_13, GPIO_PIN_SET);
		  break;
	  case 300:
		  // orange led off
		  HAL_GPIO_WritePin(GPIOD, GPIO_PIN_13, GPIO_PIN_RESET);
		  break;
	  case 400:
		  // red led on
		  HAL_GPIO_WritePin(GPIOD, GPIO_PIN_14, GPIO_PIN_SET);
		  break;
	  case 500:
		  // red led off
		  HAL_GPIO_WritePin(GPIOD, GPIO_PIN_14, GPIO_PIN_RESET);
		  break;
	  case 600:
		  // blue led on
		  HAL_GPIO_WritePin(GPIOD, GPIO_PIN_15, GPIO_PIN_SET);
		  break;
	  case 700:
		  // blue led off
		  HAL_GPIO_WritePin(GPIOD, GPIO_PIN_15, GPIO_PIN_RESET);
		  break;
	  }
	  cnt = (cnt+1)%799;
  }
  /* USER CODE END 3 */

This code just sends chars to the serial port and lights on and off the leds on the discovery board. In order to see the sent chars (from ‘A’ to ‘Z’) we will need a TTL to RS232 level converter or a LVTTL USB serial port interface. Let me stress that because of different voltage evels you cannot connect the discovery board directly to an RS232 interface.

What we still need is is the startup file. A working startup file can be downloaded from Coocox public repository. I admit, I didn’t check this file, but it works. So, download the file a put it into a new folder named sys in the Src folder of the project, and rename the file startup_stm32f4xx_fromCoocox.c (to remember from where we got it).

In the next post the SCons script will be created and used to build the application.

Using SCons with GNU toolchain for ARM on Windows – part 1 : necessary tools

[part 1 part 2 part 3]

SCons is a software construction tool, a sort of alternative to the ubiquitous GNU make. What makes SCons very interesting in my opinion is that its configuration files are actually python scripts.
In this very brief – and probably imprecise – post I just want to jot down a way to use SCons with the GNU toolchain for ARM, under Windows 7.
What I’m going to do is produce the project infrastructure with the nice STM32CubeMX application from STMicroelectronics and compile it with SCons.
So, let’s start from the beginning.

1. Install GNU toolchain for ARM

Download and install GNU toolchain for ARM. Download it from launchpad.net; in my case I downloaded and installed “gcc-arm-none-eabi-4_9-2014q4-20141203-win32.exe“.
During installation, it’s better NOT to add the toolchain path to the environment, as this will be managed in a suitable batch file in order to keep the system environment clean.

2. Install OpenOCD

Download and install OpenOCD from sourceforge.net; in my case I downloaded and installed “openocd-0.8.0.7z“. Here, “installing” means extracting the content of the downloaded archive somewhere.

3. Install the cable drivers

Now I guess it’s a matter of which h/w is used. In my case I’m using an STM32F4Discovery board, which embeds an ST-LINK/V2 cable, and I’m working under Windows 7 64 bit, so I downloaded the STSW-LINK003 drivers from STMicroelectronics website.
After installation, the STM32F4Discovery board is recognized as a “STMicroelectronics STLink dongle” peripheral, under the “Universal Serial Bus devices” category in the device manager.

4. Install the Python language

I’m working under Windows 7, which does not include “native” support for python, so it must be installed. SCons requires version ❤ of python, so let’s download and install python 2.7.x from the official website.

5. Install SCons

Now we can download and install SCons. Download the archive from SCons website; in my case I downloaded the source version 2.3.4 and followed the instructions on the SCons manual (python setup.py install).

In the next posts the project will be generated and a SCons script will be produced.